Since May 2018, the European General Data Protection Regulation (GDPR) is in application in all member states – with effects to all companies worldwide. The GDPR requires both data minimization and the right to be forgotten. This means that companies need to have a process in place to be able to erase all personal data from their Eloqua instance.
However, in Eloqua it is not enough to delete a contact and his or her activities: Personal data is often recorded on related Custom Data Objects. This means that you need to be able to erase this data from your Eloqua instance, as well.
Eloqua does not offer any standard functionalities to delete personal data within an automated process. You can create a workaround to delete contacts and their activities, using a scheduled export / import process and the upload reason “Delete”. But related Custom Data Object Records that typically hold personal data as well won’t be touched from this workaround.
They will bob up and down in your Eloqua instance. Your only option: Do a manual research and delete these records manually one by one – a time-consuming undertaking if you want to be GDPR compliant.
For Eloqua users who would rather spend their time more meaningfully, we have developed the Eloqua GDPR Deletion Manager: an app for Eloqua’s Program Canvas. Once installed, you can drag and drop the GDPR Deletion Manager into your Canvas. Now, you can define a segment to send it through the GDPR compliant deletion process. Within this deletion process, both contacts plus their activities and all related Custom Data Object Records will be erased.
In this guide, we explain how to install and use the GDPR Manager correctly.
Before installing the GDPR Manager in your Eloqua instance, you should be aware of one thing:
The GDPR Manager is a powerful tool. It allows you and your colleagues to delete all contacts and associated custom data objects. That’s cool. But do not forget that in the wrong, untrained or ignorant hands, it can irrevocably destroy your entire database! That's why you should always start with a deletion strategy and define a deletion process:
1. Define which type of contacts and conditional Information you need and want to delete
2. Define when to delete them
3. Define who is authorized to delete contacts and CDO data and who is not
4. Define an internal communication process
Once you have defined your deletion process and aligned with your colleagues, you can start implementing it in your Eloqua instance.
Start by creating a new User Role. When naming it “Deletion User”, Eloqua will automatically shorten it to “DEUS”. Pretty fitting for a user who decides about “life and death” of your contact records, right?
Eloqua users to whom you assign the role "Deletion User" will later be the only users in your Eloqua instance who can delete contacts and CDO records. Remove these options for all other user roles. Last but not least you assign the User Role of the "Deletion User" to all Eloqua users who are familiar with the deletion process and are trained for it.
Side note: The services of the GPDR Manager are visible for all Eloqua users. However, the delete function of the app only works if the user who created the program also has the right to delete contacts and CDO data.
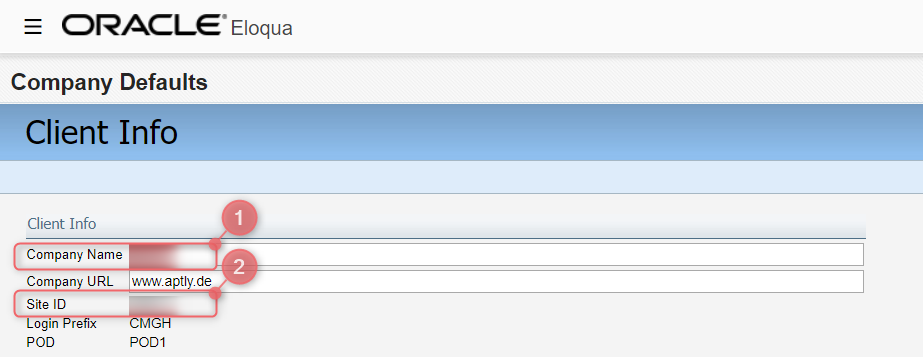
In order to activate the app in your Eloqua instance, APTLY needs information about:
1. your Eloqua Company Name and
2. your Eloqua Site ID.
Both of these information can be found in the Client Info at the Company Defaults:
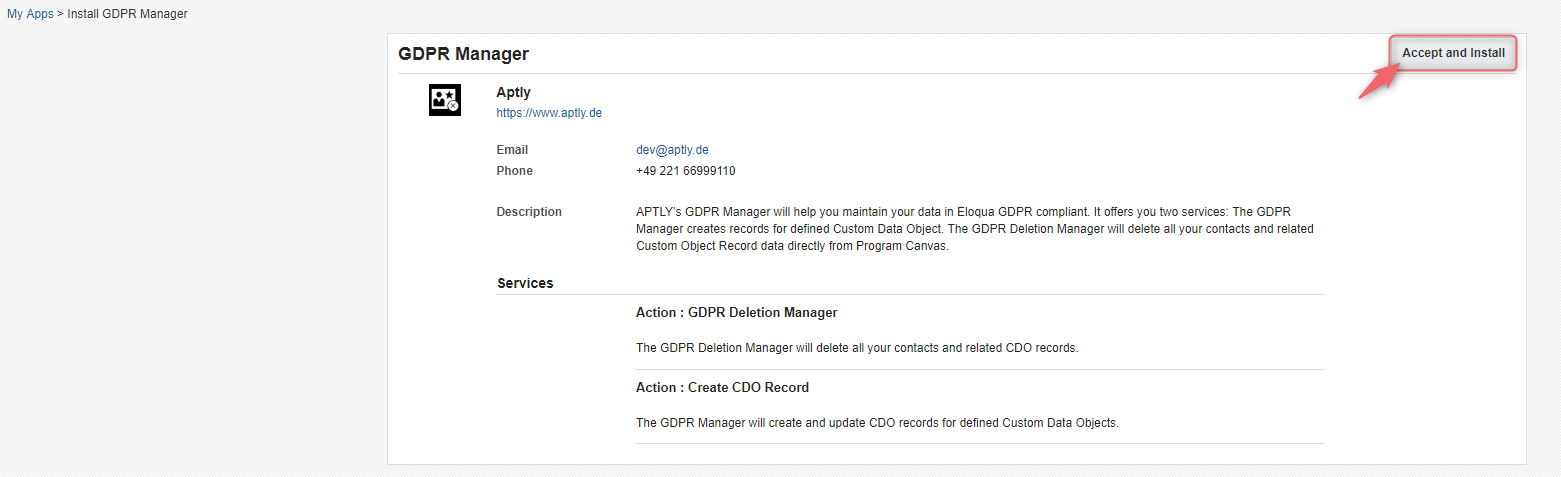
 As soon as we added your Eloqua instance to our service whitelist, you’ll receive an information from us, as well as a link to install the GDPR Manager.
Click “Accept and Install” to complete the installation.
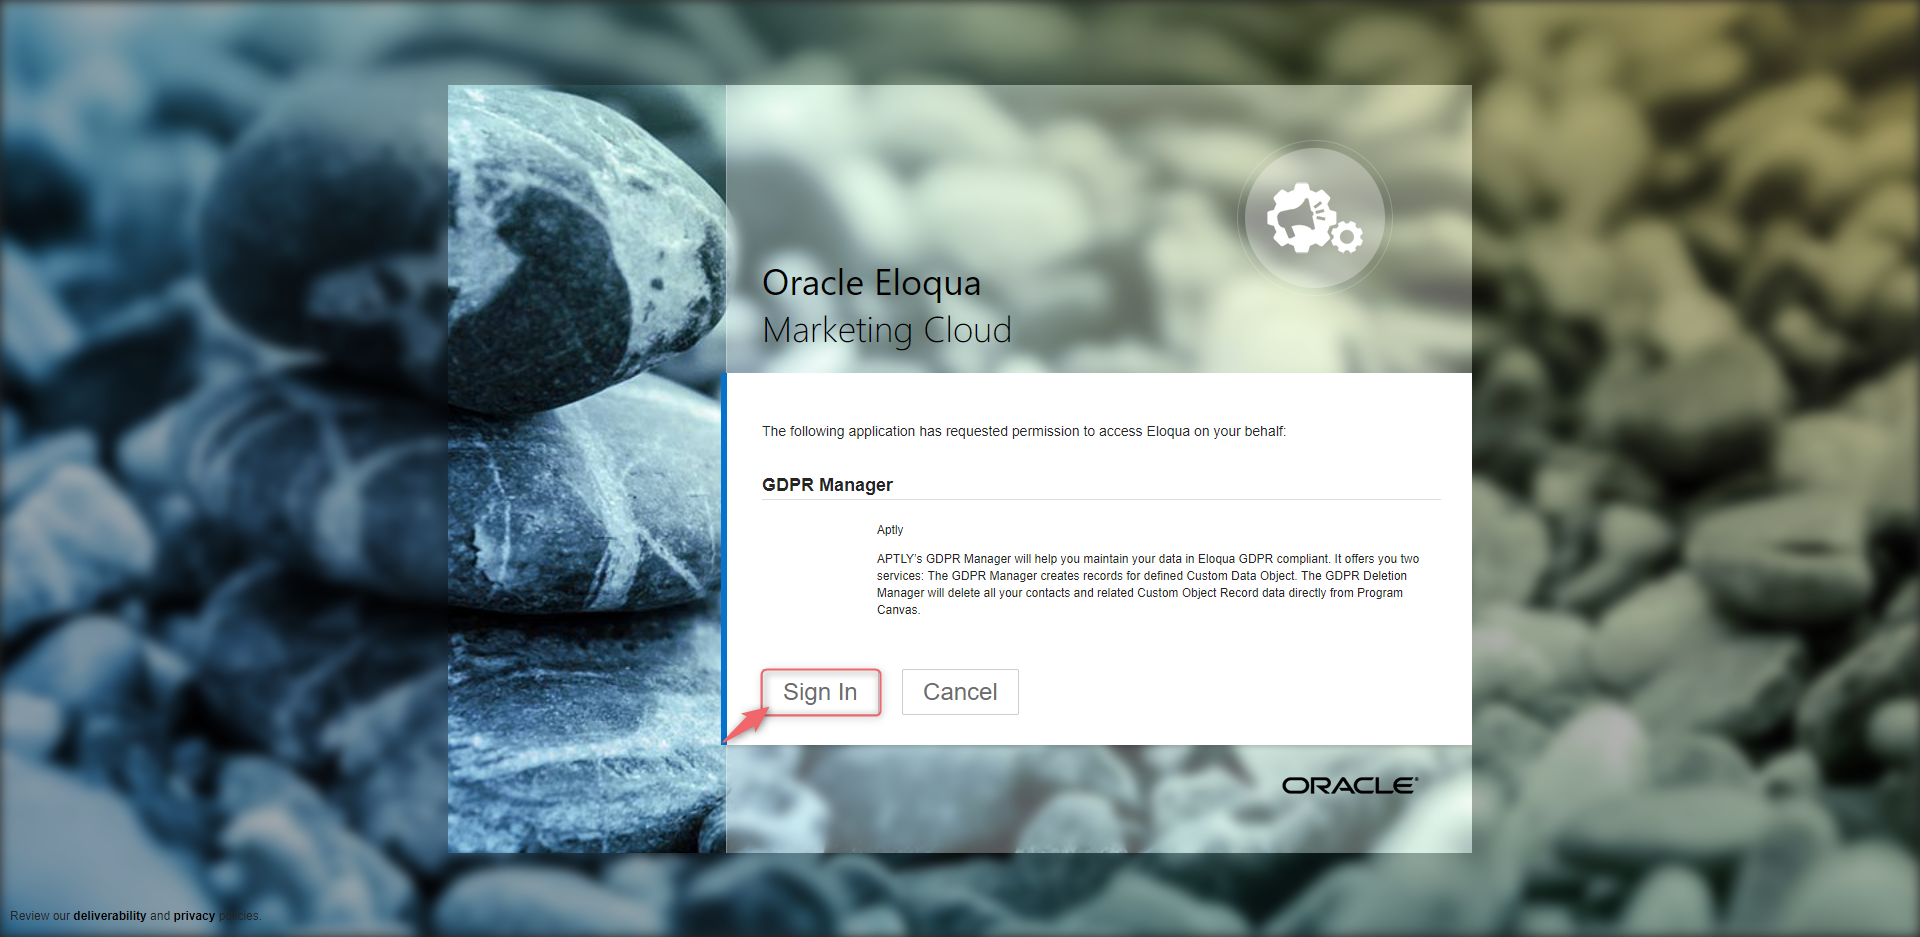
 Ideally, you should use the Eloqua credentials that your company uses to install apps. If there is no such user, you can of course enter your own Eloqua credentials.
Small side note: Why does it make sense for your company to have an Eloqua user for installing apps? If regular Eloqua users are used for the app installation and these colleagues leave the company at some point, you will usually also deactivate their Eloqua users. Apps installed via this Eloqua user will then no longer run and must be reinstalled. You can avoid this by setting up an Eloqua user that is used exclusively for the app installation.
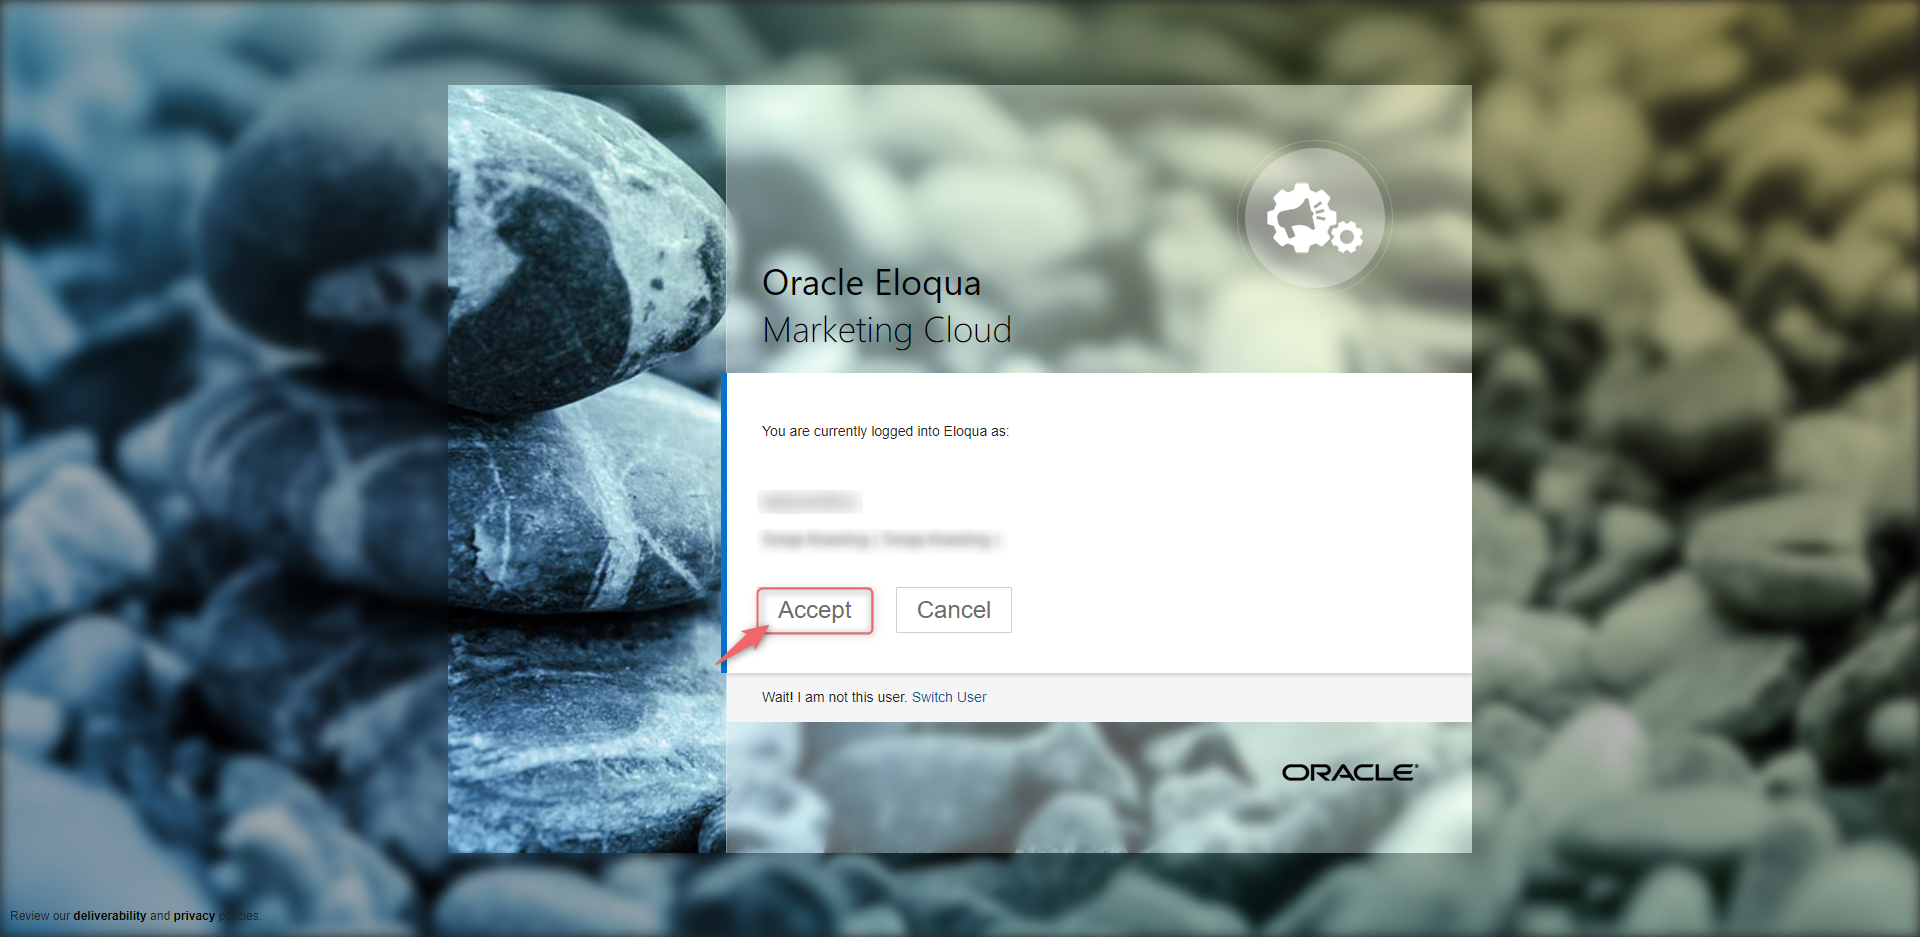
 Subsequently, you just have to click “Accept” again and the GDPR Manager will be listed in your apps.
By default, the dependent data of all Custom Data Objects are deleted when a contact is running through the GDPR Deletion Manager.
But: We know from experience that you may have use cases in which you have set up Custom Data Objects for reporting, which of course should still be evaluable in the future. If you want to anonymize the data of these Custom Data Objects and not delete it, you can exclude these CDOs from deletion.
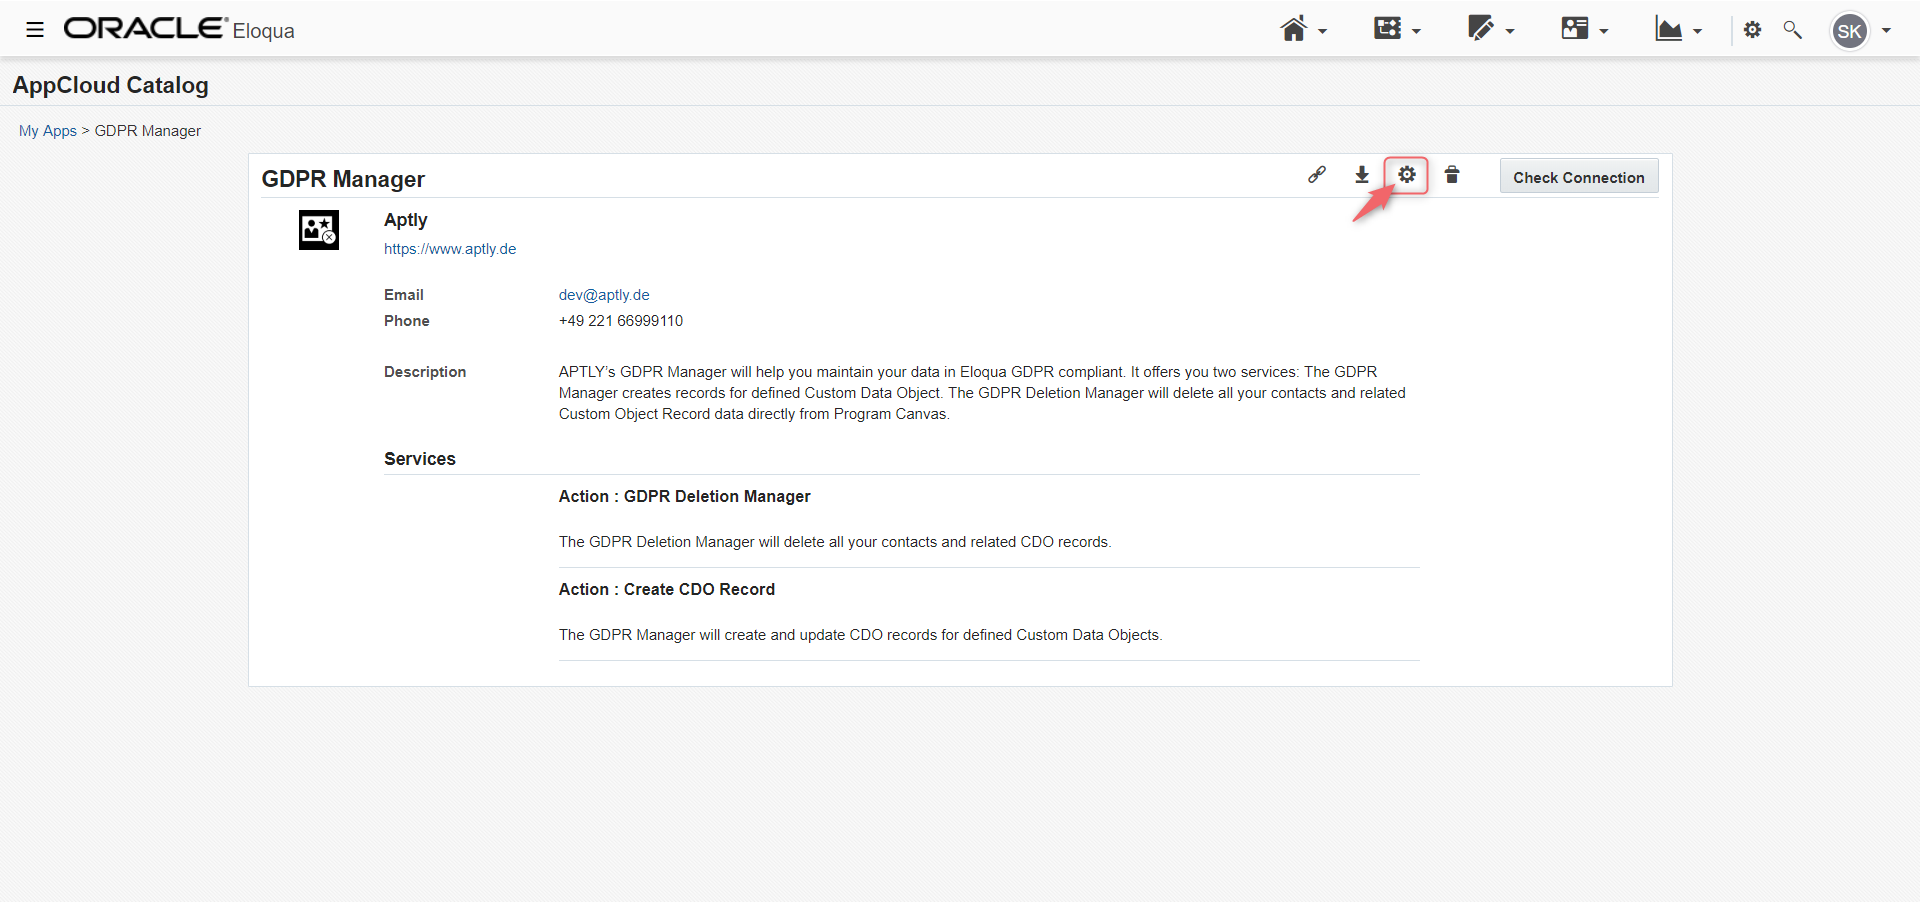
To do so, click on the Configure icon.
 On the configuration page, you can choose for how long you want to keep the data on the deletion log page. The GDPR Manager allows a maximum duration of 30 days before the log is irrevocably and automatically deleted. In addition, the configuration page lists all your custom data objects in the order in which they were created.
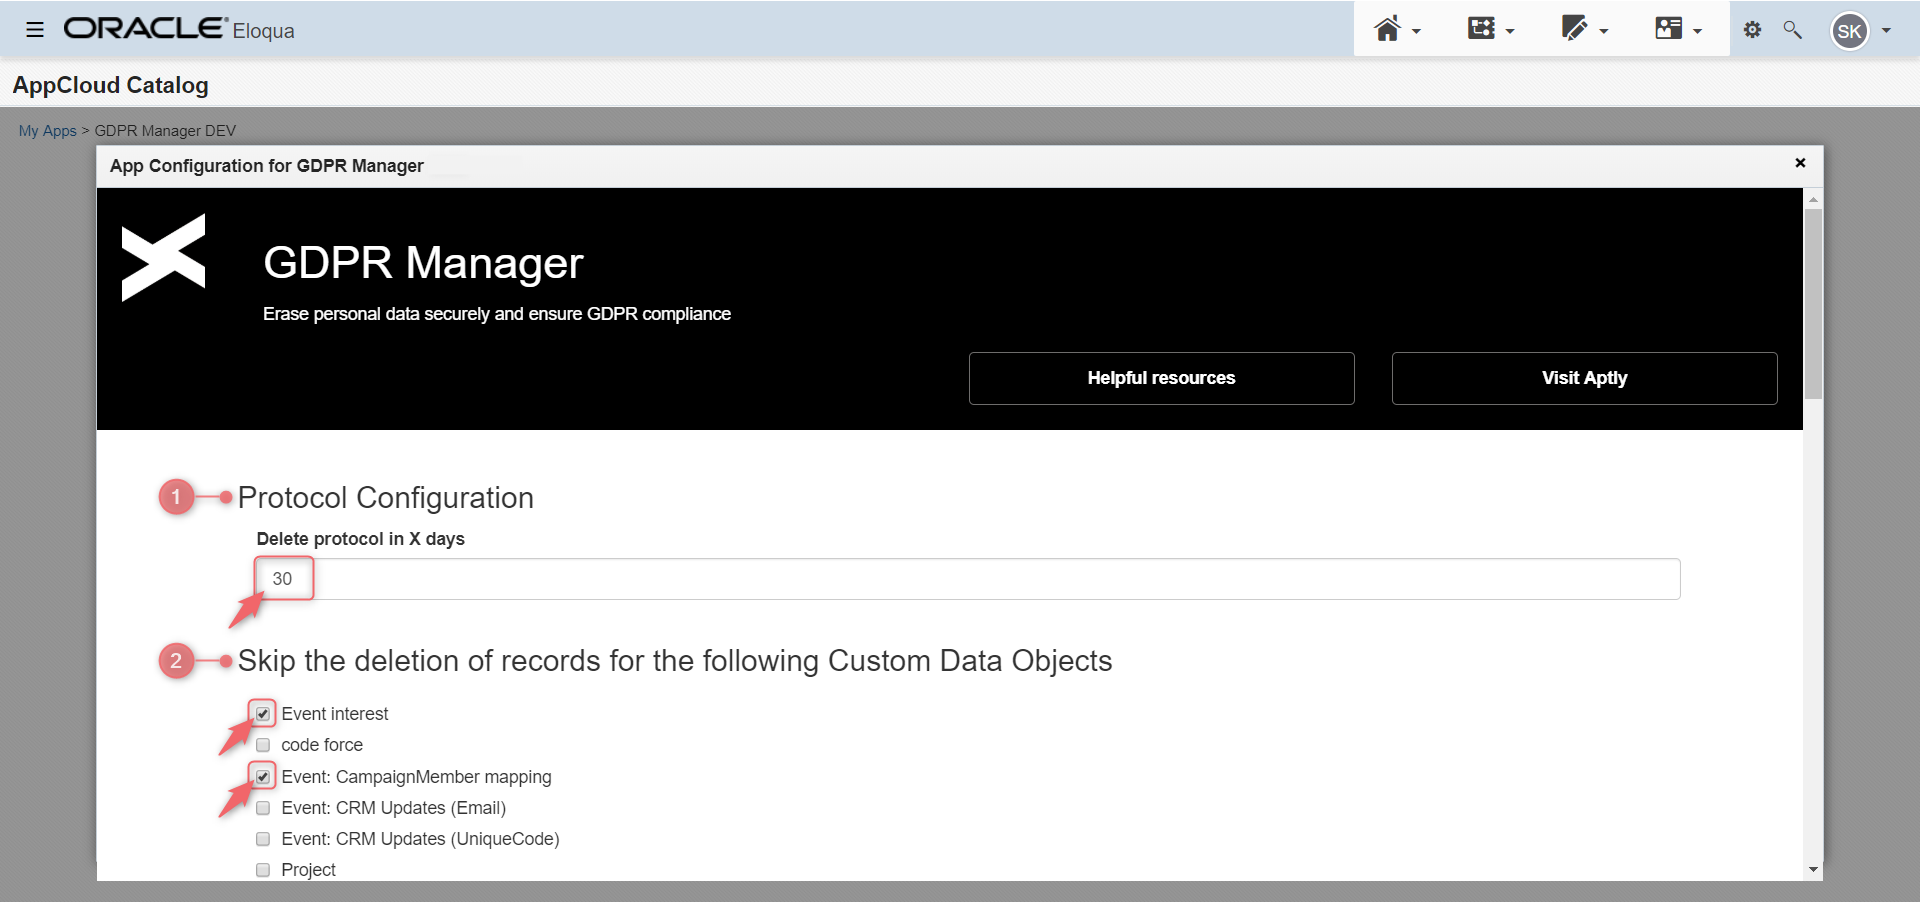 Click on the Custom Data Objects you want to exclude from the deletion process with the GDPR Deletion Manager and scroll down to the Save button to save your settings. The selected Custom Data Objects will not be touched by the deletion process with the GDPR Deletion Manager. They remain as they are in your Eloqua instance, even if the contact with all other dependent CDO records has been deleted.
For the omitted CDOs, you must make all personal data anonymous in the course of your deletion process in order to remain GDPR compliant. In this blogpost we show you a best practice for an anonymizing process.
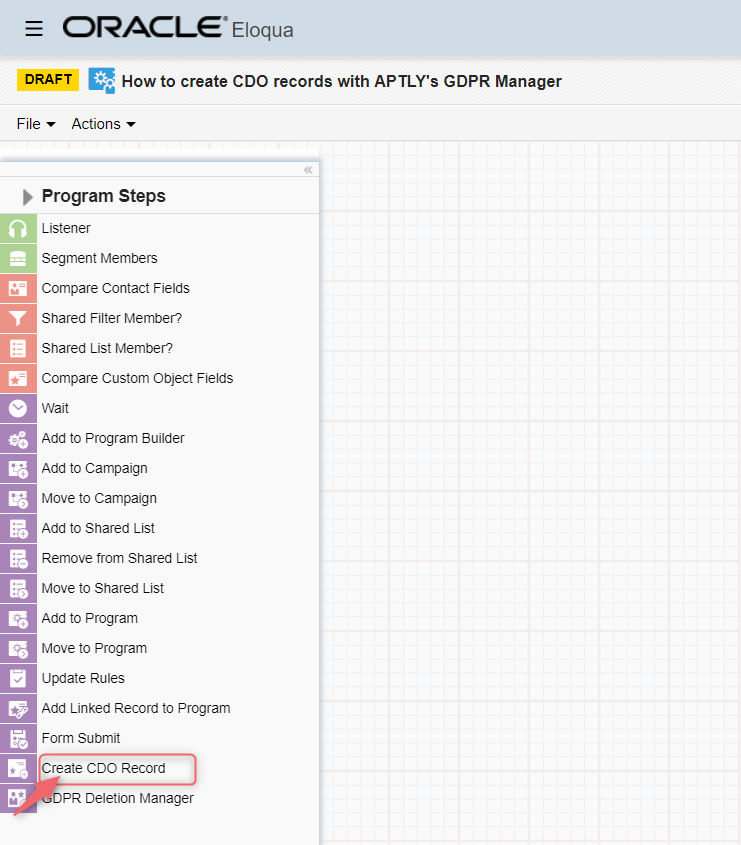
Once the GDPR Manager is installed, you will find the app in the Actions section of your Program Canvas. If you don't see it directly, simply open the menu above the arrow on the left and all possible actions that you can use in the program canvas will appear.
 A simple deletion program should contain the following steps:
1. one or more segments filtering those contacts that are to be deleted
2. the GDPR Deletion Manager and
3. a wait step for the error path to which contacts are sent for which the deletion was unsuccessful
 Double-click on the GDPR Deletion Manager to open the configuration dialog. Select the tab "Routing" and tick the checkbox "Automatically route contacts with errors from cloud app" to select the error path.
 This was just a very, very simple deletion process. We'll show you what the best practice looks like in this blogpost.
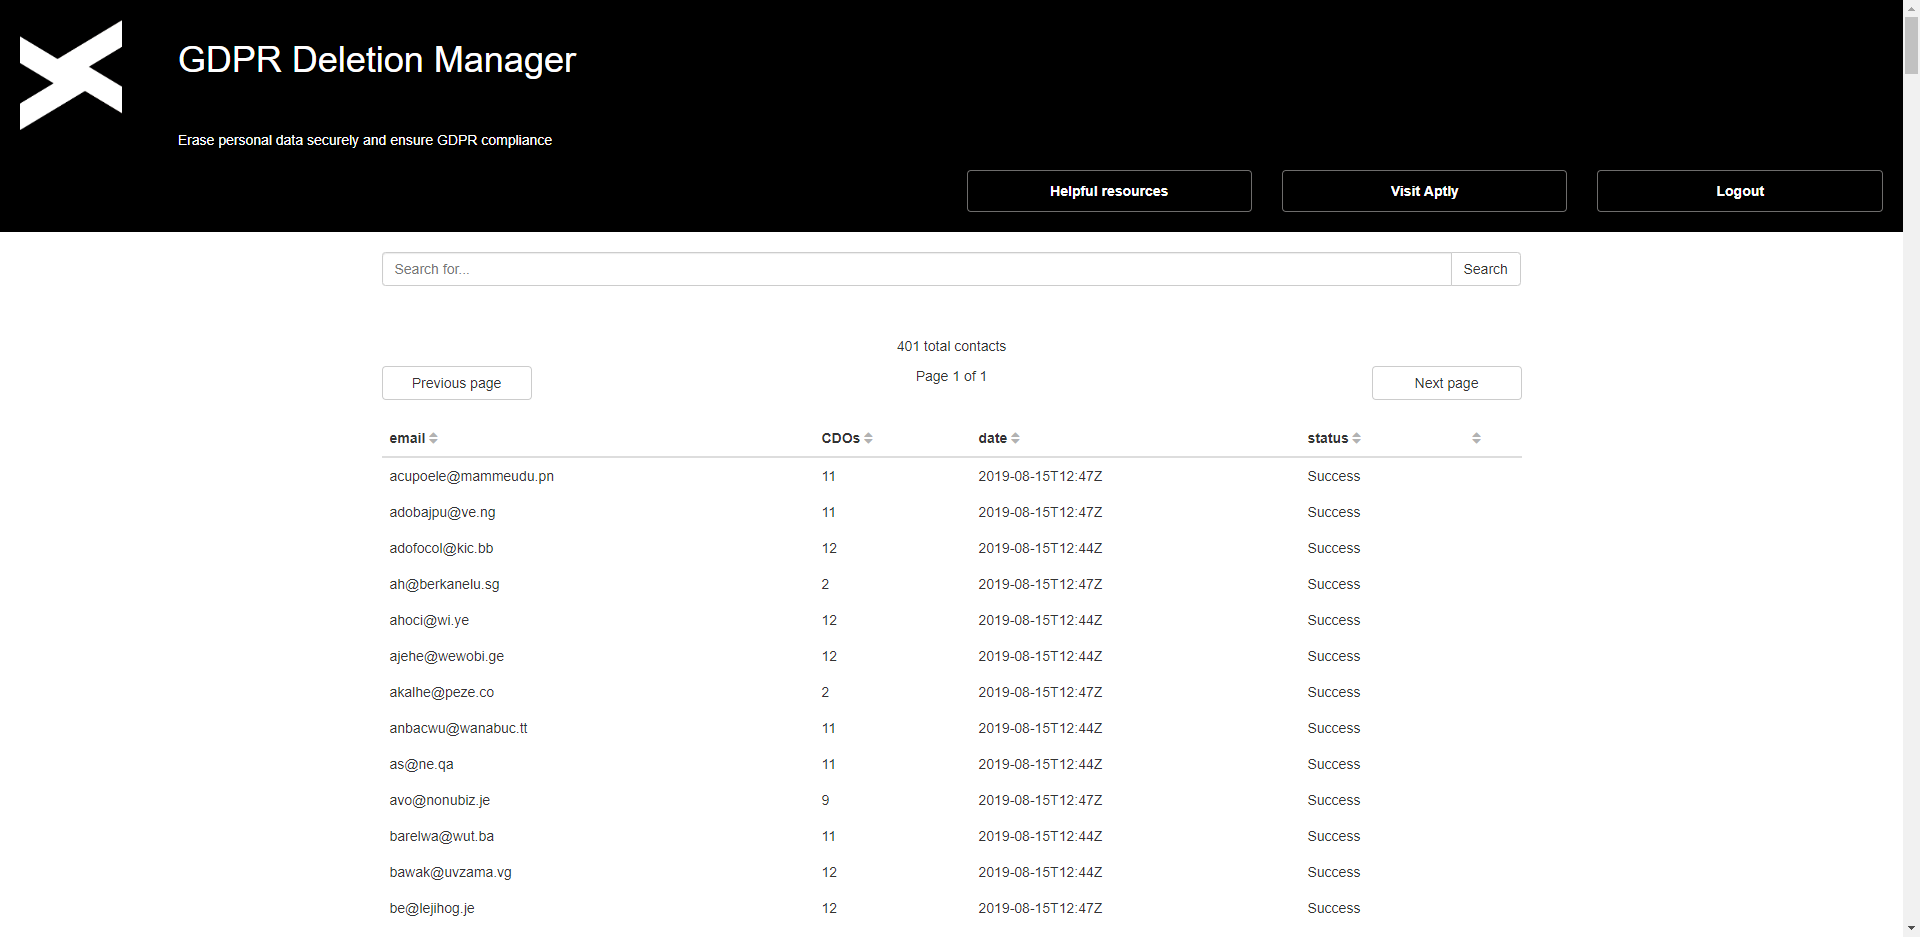
If a contact has actively asked for their personal data to be deleted, you must also be able to provide proof of this. This is required by Article 19 of the GDPR. Therefore, the GDPR Deletion Manager provides you with a deletion log, which you as the data controller can use to control the process.
The data in the log itself is stored for up to 30 days and then automatically deleted irrevocably. Why 30 days? This corresponds to the maximum duration a company is allowed to schedule for the entire deletion process. If you would like to reduce the duration, you can do so on the configuration page, as described in step 4.
Visit https://gdprmngr.aptly.de/protocol and log in with your Eloqua credentials to see the log of your data deletions. Within the log you can sort by columns or search for a specific email address.
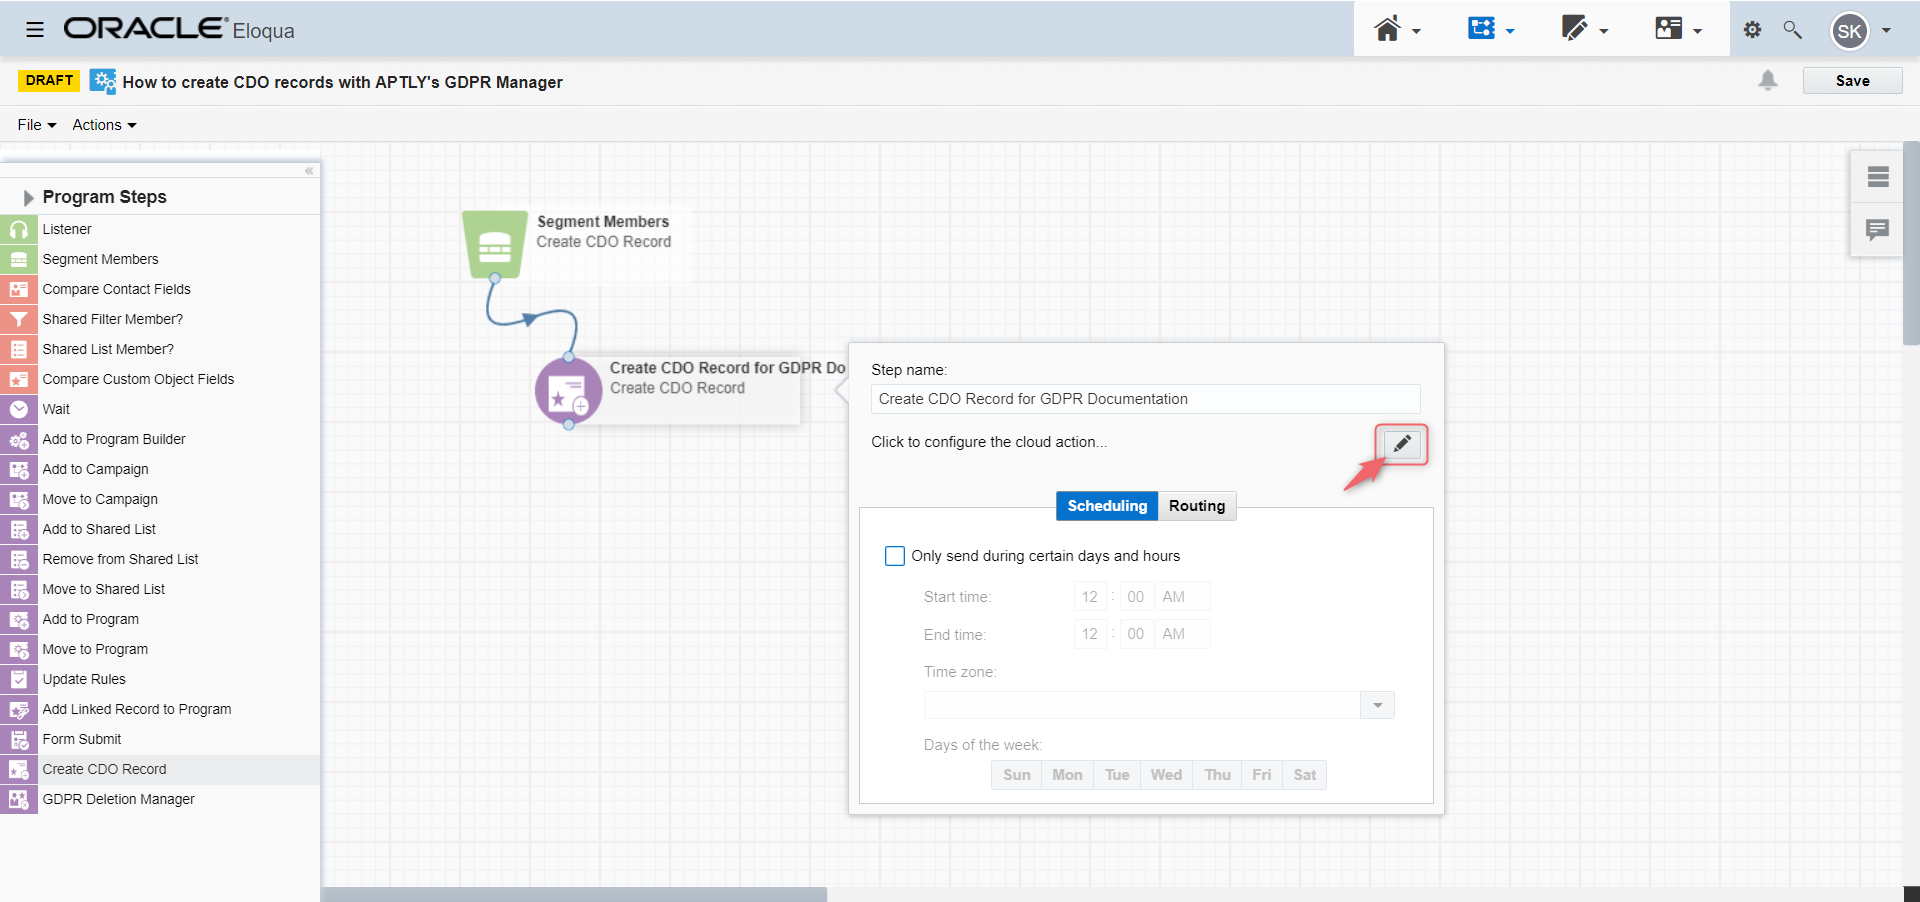
Once the GDPR Manager is installed, you will find the "Create CDO Record" service in the Actions section of your Program Canvas. We have deliberately refrained from calling the service "just" GDPR Manager because it is a powerful tool for so many more use cases outside of GDPR documentation.
 You can drag and drop the app service "Create CDO Record" into your program canvas. Click on the pencil icon to open the configuration page.
 On the configuration page, you must first select the Custom Data Object for which you want to generate or update records. The rule is very simple: If the CDO has a unique identifier, the CDO record will be created the first time. If the same contact runs through the program more than once, its CDO record is updated each time. If the CDO does not have a unique identifier, a CDO record is generated for the same contact each time. We call this snapshot CDO.
 Once you have selected a CDO, the GDPR Manager drags all fields of your CDO into step 2 of the configuration page.
 Now you can choose between three options for each field:
No Mapping:
You do not want to set a value for this field.
Static Mapping:
You want to define a fixed value for this field.
Contact Mapping:
You want to write a value from the contact data to the CDO.
For all of these options, the GDPR manager thinks along with you: If the CDO field is a text field, you can enter any character string - until the maximum allowed character is reached.
 If the CDO field is a date field, you can either set a timestamp by selecting "Apply datestamp for now" or use the date picker to set a date of your choice.
 The GDPR Manager also helps you to select the correct data types for contact mapping: If you want to write a value from a contact field to a CDO field with the data type Text, it lists all contact fields in alphabetical order that are suitable for it.
 In the same way, if you want to write a value from a contact field to a CDO field with the data type Date, it lists all contact fields of this type in alphabetical order.
In Step 3 you save your configuration by clicking the Save button. That's it!
Small outlook: Currently, the GDPR Manager only offers you the possibility to create CDO records or to overwrite existing values when updating an existing record. In the coming releases, an even more rule-based configuration will be possible.
Now we have already talked a lot about the fact that "Create CDO Record" is applicable for more than only GDPR documentation. We don't want to keep you on your toes any longer: In this blogpost we show you more exciting use cases.